Introduction:
One of the most frequent things you’ll do while using the command line is copy files and directories. Within Linux, there are multiple commands for copying files; the most commonly utilized ones are cp and rsync. Using the cp and rsync commands to copy files and directories is standard procedure. You need to have at least read permissions on the source file and write permissions on the destination directory in order to copy files and directories. Using the command line, this tutorial will demonstrate How to Copy Files and Directories in the Linux Terminal. Additionally, the following commands explain how to make backups of the entire system or how to filter and replicate only particular files.
What is the cp command?
When copying files from one place to another, you use the cp command. Folders and directories can also be copied with this command.
The Linux cp command:
To copy files and directories from one location to another in Linux, use the cp command. The acronym for “copy” serves as a basic command-line tool for managing files.
There is a special syntax for copying directories with the cp command. For directory copies to be successful, it is essential to comprehend the fundamental structure of the command.
The cp command syntax:
cp [options] source_directory destination_directory
Below is a breakdown of each syntactic element:
cp: This is the actual command, meaning “copy.”
[Choices]: This stands for optional options and flags that can change how the cp command behaves. Options can be used to provide additional features, including retaining characteristics, enabling recursion, or displaying progress. They are usually prefixed by a hyphen (-) or double hyphen (–).
The directory you wish to copy is called source_directory. Either an absolute or relative path can be supplied.
The directory where you wish to copy the source directory is called the destination directory. Additionally, a relative or absolute path can be supplied.
Here are some key concepts and features of the cp command:
- Copying files: You can copy individual files with the cp command. First, we supply the destination directory or filename, then the path and name of the source file.
Copying directories: Entire directories can be copied using the cp command. Recursive copying must be enabled by including the -r (or –recursive) option in order to copy a directory and all of its contents. By selecting this option, you can be confident that every file and subdirectory inside the directory gets copied. - Preserving file attributes: When a file is copied with the cp command, its permissions, timestamps, and ownership are not retained. To maintain file attributes during copying, we can, however, use the -p (or –preserve) option.
Managing existing files: The cp command resolves conflicts arising from the existence of files or directories with identical names at the destination location while copying files or directories. It automatically overwrites the current files without asking. We can prompt before overwriting existing files by using the -I (or –interactive) option.
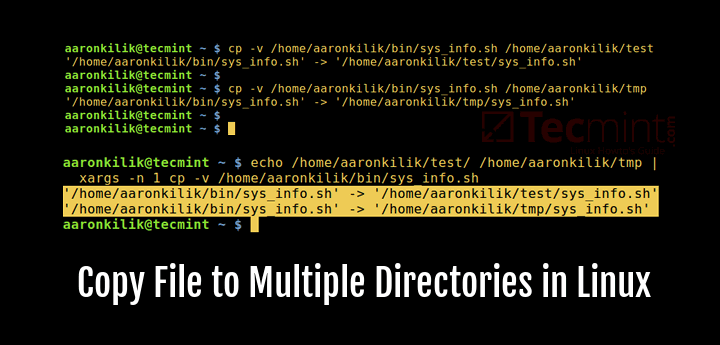
How to Use the cp Command to Copy Files and Directories in Linux:
The cp the command works similarly on most Linux distributions. The command operates in four basic modes.
- Copies a file to the same directory. The new file must have a different name.
- Copies a file to a different directory. It is possible to rename the file or retain the old name.
- Copy multiple files to a different target directory.
- Recursively copy the contents of a directory, including subdirectories, to a different target directory.
There are several things to consider before using cp. For example, cp overwrites an existing file without displaying a warning. When copying a file to a new directory that already has a file with the same name, this situation arises. The likelihood of this issue occurring increases while copying many files. Users can use interactive mode to make Linux ask for permission before overwriting a file in order to prevent this issue.
Cp is often used in conjunction with the ls command. ls is used to list the contents of the current directory. This is helpful in confirming the exact name and location of the source files and directories.
Some of the most important cp command options include the following:
-f: Forces a copy in all circumstances.-i: Runscpin interactive mode. In this mode, Linux asks for confirmation before overwriting any existing files or directories. Without this option, Linux does not display any warnings.-p: Preserves the file attributes of the original file in the copy. File attributes include the date stamps for file creation and last modification, user ID, group IP, and file permissions.-R: Copies files recursively. All files and subdirectories in the specified source directory are copied to the destination.-u: Overwrites the destination file only if the source file is newer than the destination file.-v: Runscpin verbose mode. This mode provides extra information on the copying process. This is useful for keeping track of progress when copying a large number of files.
The symbolic link processing method for the cp command is specified by the options -H, -L, and -P. For a further explanation of cp and symbolic links, see the cp man page. The CP settings differ depending on the Linux distribution. The Ubuntu CP documentation has a list for Ubuntu 22.04 LTS.
Conclusion:
Understanding the syntax of the cp command allows us to copy directories and their contents quickly and effectively.
This article has covered the methodical procedure for recursively copying directories along with their contents to various locations. Several significant aspects of the cp command have also been covered.
So feel free to give it a try:)
Have fun coding!
Let’s connect, and we’ll help you with everything from programming to hacking, and more. Simply visit our website, linuxhints.info, for guidance on all things related to Linux and similar operating systems.
Get more information about
eBPF XDP: The Basics and a Quick Tutorial