
Introduction:
Ensuring that servers and websites run smoothly is critical to web hosting and network administration. Using the Ping in Bash Scripts is an effective way to find out if a host is available in an Ubuntu environment. Sending Internet Control Message Protocol (ICMP) echo request packets to a certain host and waiting for a response is the basic yet powerful application, Ping. In this post, we’ll explore how to effectively use ping in Bash scripts to check on a host’s availability on an Ubuntu system.
What is Ping Command in Bash
The ping command is used to send ICMP echo request packets to a specified host or IP address in order to test connectivity and measure the round-trip time (RTT) between the source and destination.
Ping Command Syntax and Options:
On the majority of Linux operating systems, ping comes pre-installed. Use this command to find out the installed ping version to see if your system has it:
ping -V
If ping is installed, you will see the version number. Otherwise, Terminal will return the command not found error.

Depending on your machine’s operating system, the installation steps may differ. For example, we will run this Linux command to install ping on our Ubuntu 20.04 test system:
sudo apt-get update && install iputils-ping
Once installed, run the ping command with the following syntax. It should be the same for all distributions:
ping option destination
Enter the precise IP address, hostname, or URL of the target system in place of destination. An option to customize the behavior of the command can also be included. These are a few of the most well-liked choices:
| Options | Usage |
| -c | sets how many packets to send |
| -a | plays a sound when the destination responds |
| -i | changes the interval to send packets |
| -v | enables verbose output |
| -V | checks the ping version |
| -q | summarizes all the ping results in one output |
| -f | floods the destination host with a large number of packets for stress tests |
| -4 and -6 | specify the destination IP address protocol as IPv4 or IPv6, respectively |
| -s | modifies the maximum transmission unit |
| -D | starts each ping result with a UNIX timestamp |
| -W or -w | sets a timeout for each packet or session, respectively |
Pro Tip
Combine multiple ping command options for more specific testing.
How to Use the Linux Ping Command
The usage cases, syntax, and output of the Linux ping command will all be covered in this section. Use an SSH client, such as PuTTY or Terminal, to connect to a remote computer and execute these commands. Use the integrated Browser Terminal if you’re a Hostinger user.
1. Check Connectivity:
The simplest ping command allows you to examine the internet connection of a server. To verify whether your computer is online and able to connect to Google’s host server, for instance, do the following commands on it:
ping google.com

Use this command to check whether your VPS is running and responding to the client’s connection. Use its hostname or IP address as the destination:
ping 185.185.185.185
Your computer is up and running and connected to the internet if the Terminal sends back an ICMP echo message response.
Otherwise, there can be a problem with the client’s PC or the VPS. Ping the hostname of your present system to see whether there is a network connection issue:
ping localhost
Should the ping command yield an echo response, the issue is with the system located remotely.
2. Specify the ECHO_REQUEST Number:
Ping delivers an infinite number of packets by default until the user ends the procedure. Use the -c option to deliver a specified number of packets:
ping -c * destination
Replace * with the limit number for your packets. For example, this ping command will send five packets to the specified IP address:
ping -c 5 185.185.185.185

3. Audible Ping:
When the target device responds to the ping command, the -a option will sound. This option is helpful for debugging networks since it avoids the inconvenience of having the Terminal open until it receives a response.
The output and syntax are the same as those of the standard ping command:
ping -a destination

4. Set Intervals:
Every second, a packet will be sent via the ping command. It might, however, need to be modified for a particular task. When troubleshooting, for example, a shorter time interval is helpful because you will obtain more data samples.
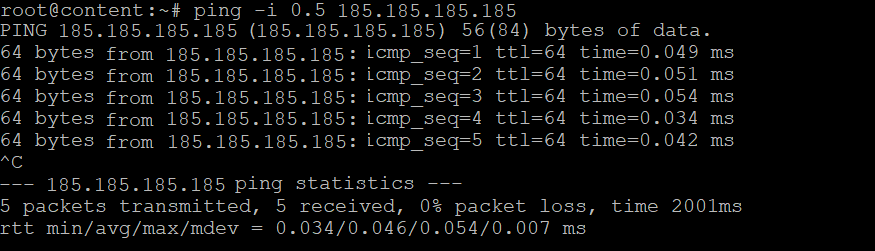
Use the -i option and enter the desired number of seconds to modify the ping interval’s default value. Use a decimal if you want to set it faster than a second. Here’s one instance:
ping -i 0.5 185.185.185.185
5. Receive Only the Linux Ping Command Summary:
Given the Terminal’s lengthy output, it can become tiresome to continuously monitor pings. Make use of the -q option to simplify the results. The following command will ease analysis by compiling all of the ping statistics into a single output:
ping -q destination
If you don’t specify the number of packets, the summary will appear after you terminate the process.

6. Flood the Network with the Linux Ping Command:
The ping command lets you rapidly send packets in large quantities using the -f option. It helps simulate your server performance during a traffic spike or distributed denial-of-service (DDoS) attack. Here’s the command syntax:
ping -f destination
Like the -q option, the ping flood command will only show the summary of the packet responses. For example, the following output shows we sent over 200 ping packets in two seconds.

7. Specify the Internet Protocol
The IPv4 address space is filling up due to internet growth, while IPv6 is starting to proliferate. IPv4 is the default internet protocol used by the ping command, although you can use any other protocol.
To use an IPv4 address, add the -4 option; to send an IPv6 ping, add the -6 option. The ping commands look like this:
ping -4 destination
ping -6 destination
You can still ping a hostname or domain name with these options. In this case, the output will show that the destination is resolved to the corresponding IP address.

Conclusion:
This tutorial provides several examples to demonstrate how to use the “ping” command in a Bash script to check one or more IP addresses and domain names. This article demonstrates how to utilize the -c option. After reading this tutorial, the fundamental applications of the “ping” command become evident.
Get more information about
How to Add a Progress Bar in Shell Script